

How To Adjust Skin Tones In Gimp
How To Use {Blending} Modes in GIMP {the Complete Guide}

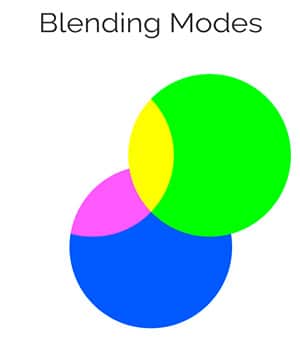
Table of Contents
What are {Blending} Modes?
In essence, a Fashion is a tool that allows y'all to manipulate one layer to alloy together with the layer below. Modes are coded with a specific algorithm to provide a particular outcome.
The artistic effect is based on the Manner you choose and how information technology interacts with the colors, contrast, etc., of a layer.
Annotation: I'grand an artist and non a mathematician. I take no idea how the algorithm works, nor exercise I care to know.
I'm more interested in how my layers expect after applying a Mode.
How Blending Modes Piece of work In GIMP
I'll now demonstrate how Modes work in GIMP. Refer to the images equally I draw what happens.
The Alloy Color layer consists of a solid color and hides the layer beneath (Base Color). The current Blend Mode is prepare to Normal.
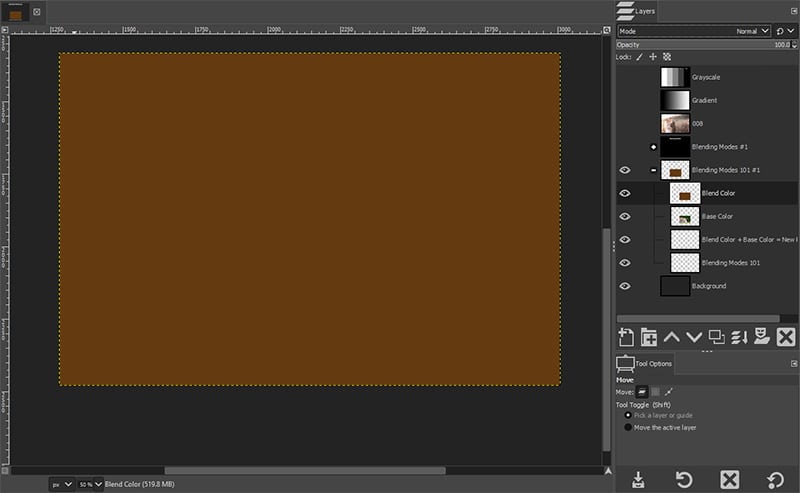
The agile layer is the Alloy Layer.
Normal Mode
This Mode reveals the layer for what it is… a solid color. It'due south, well, Normal. When you change the Layer Way from Normal to anything else, something magical happens.
I activated the Color Mode for the layer, and now we can see the prototype layer below.
Not only that, it composite the solid color layer (Blend) with the layer below (Base) to provide an "artistic" (sepia tone) effect.
How cool is that?
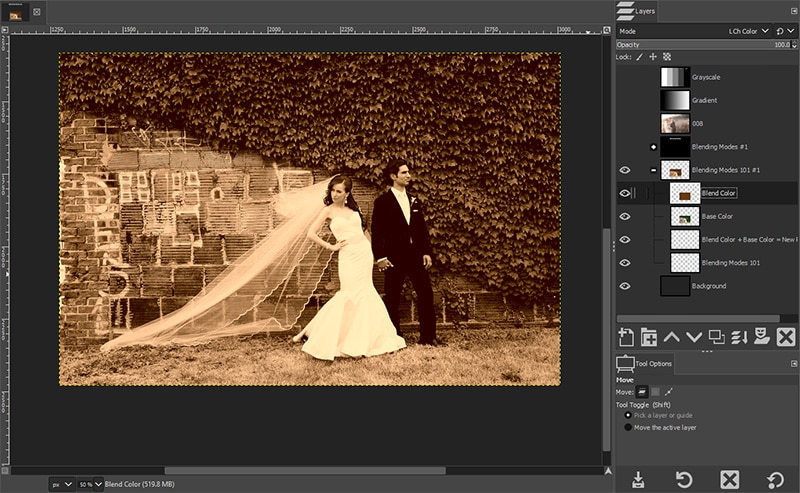
The active layers Blend Way was changed to Colour Mode. The end result shows how the two layers "blended" together. The image layer (below the Blend Layer) is known as the Base of operations Colour.
Pro Tip:
Alloy Color (superlative layer) plus Base Color (lesser layer) = a new event. The new result may or may not give you the desired effect, though. That'due south why in that location are 38 to choose from. Decide for yourself if you like ane Style vs. another.
How Modes are Organized In GIMP
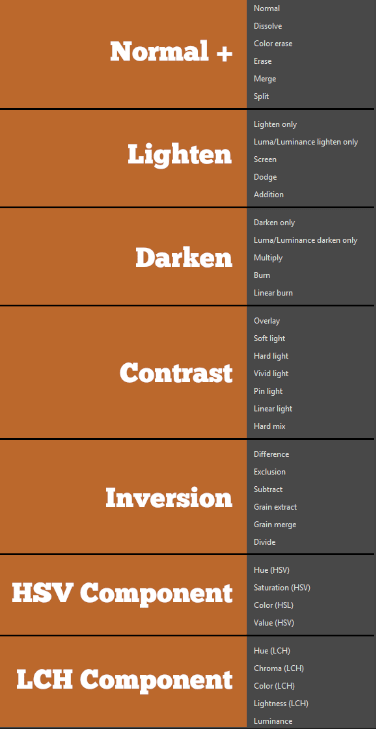
How Each Blending Fashion Interacts With a Layer

Let's dive into the Style groups to better empathize how each group interacts with a layer different from the others. Each named group gives you a clue to how information technology will interact with a layer, except for the last two, which are advanced Mode types.
The image to the left consists of three solid colored circles. The Alloy Mode for each is set to Normal.
In this paradigm, I inverse the Fashion to Multiply for the red circle, and information technology disappeared.
For this 1, I inverse the background to white and set the Way for the red circle to Screen. This causes the red circle to disappear.
Annotation: All the same find Blending Modes confusing? Would yous like a more in-depth overview of how they work?
If so, yous may want to check out my GIMP Made Easy online class, where I go into more detail on how Modes piece of work (includes class files to follow forth).
If you refer to the "vii grouped modes" image (to a higher place), y'all can run across that the Multiply Fashion is in the Darken group and Screen is in the Lighten group.
Therefore, a mode in the Darken group will, yep, make that layer darker and vice versa for the Lighten group.
The Dissimilarity group interacts with… yep, the dissimilarity of a layer and Invert, inverts the layers' colors.
Next, we'll explore each group with a grayscale overlaid on a photograph to come across how each Fashion grouping interacts and blends with the layer beneath it.
Normal
Mode
Grouping
Once upon a fourth dimension, in GIMP 2.viii, there were only two Modes in this group; Normal + Dissolve. I'k non sure the other four are "normal."
I have a feeling the developers couldn't decide on a group for them and lumped them into this get-go grouping.
Nosotros covered Normal previously, so permit's go over the others…
Lighten
Mode
Group
In full general, this group will make the layer below lighter with varying degrees of contrast. However, when it comes to pure black, it's neutral. In other words, for this grouping, solid black (in the Blend Color) will not interact with the Base Color.
This group consists of 5 unlike Modes…


Darken
Mode
Group
This group is the opposite of Lighten. Instead of black being neutral, white is. Here are the 5 Modes that make up this group…


Contrast
Mode
Grouping
For the Contrast group, 50% gray is neutral. In general, these modes will increase or decrease contrast based on the pixel values of the image.
Of the 7 Contrast Modes, I tend to use mostly Overlay & Soft Light. Of the bunch, those 2 piece of work best with images. At least based on my preference.


Inversion
Fashion
Group
For this group, the colors volition exist inverted or canceled out. Again, I don't have much utilize for these Modes for images.


HSV + LCH
Compontent Modes
Both the HSV & LCH Modes are very similar to each other. They both touch on the colors of the Alloy layer.


Advanced Blending Mode Options
Gauge what? You're not limited to the creative result provided by the Blending Modes alone. You can use other tools in GIMP to customize the Blend Fashion result to tweak your edit.
For example, maybe you like the outcome of a Fashion you've chosen, but it's too intense. Tone it down by lowering the Opacity!
Or maybe the blending of the ii layers is what you wanted, but the peel tones are out of whack. Employ a Layer Mask to remove or tone it down!
At present What?
Like this article? If so, please share!
Source: https://parkerphotographic.com/how-to-use-blending-layer-modes-in-gimp/
Posted by: ardishurp1976.blogspot.com
0 Response to "How To Adjust Skin Tones In Gimp"
Post a Comment